

In this tutorial you’ll learn how to create a flat-style super-long scrolling background for a website! What’s more, in a follow-up tutorial, you’ll have an opportunity to see it in action and to discover how to make it work! For this part of the tutorial, we’ll be using Adobe Illustrator, its basic shapes and functions to create a fantastic composition with various elements, connected with one and the same topic.
By the end of this lesson, you’ll be able to use your new techniques not only to create a website background, but also any other kind of flat-style compositions or illustrations, such as seamless backgrounds for games, flat-style cityscapes, and many others. Browse the Envato Market for unflagging inspiration, and get ready to follow the exciting process!
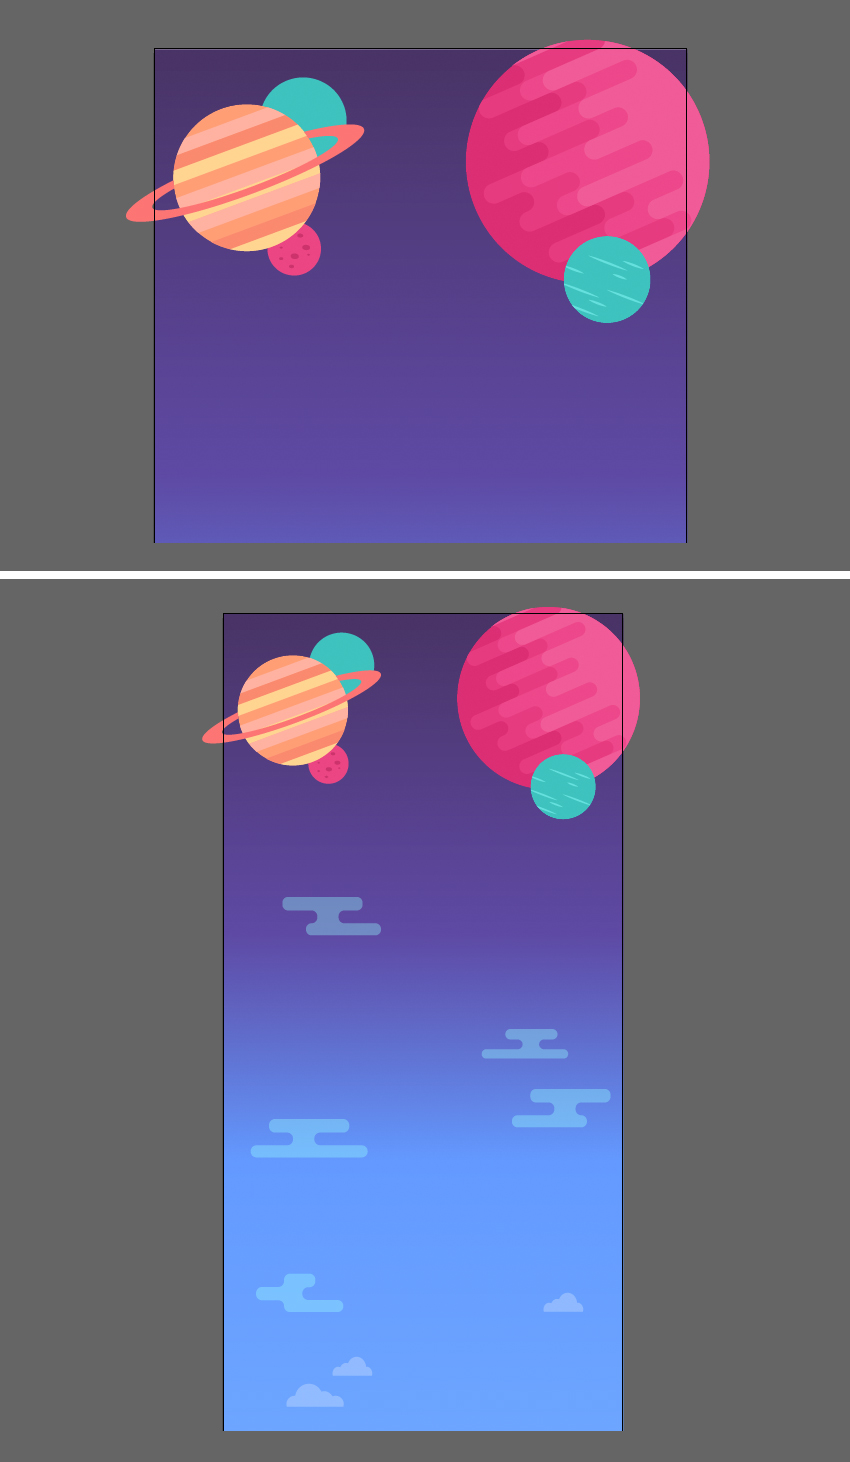
1. Create Space Objects & Planets
Step 1
Let’s start making our first planet! Take the Ellipse Tool (L) and hold Shift to make a dark-magenta circle of365 x 365 px size.
Switch to the Rectangle Tool (M) and make a pink stripe of 450 x 30 px size.

Step 2
Keeping the stripe selected, press Enter to open the Move options window. Set the Horizontal value to 0 pxand Vertical value to 30 px.
Press Control-D multiple times to repeat our last action and cover the whole circle with stripes.
Now select alternate stripes (I’ve marked them with dark color in the screenshot below to make it clear) and make the selected stripes much shorter.

Step 3
Now select all the stripes and Unite them in the Pathfinder to merge them into a single shape. Before doing that, you can vary the length of some of the stripes, making them shorter or longer. However, you can also do that after Uniting the stripes, but in this case you will need to use the Direct Selection Tool (A), select the pairs of anchor points, and move them left or right.
When you’re happy with the position of the stripes, select everything with the Direct Selection Tool (A) and use the Live Corners feature to make the corners fully rounded by dragging the tiny circle markers that are located next to each corner.
This feature is available only in Adobe Illustrator CC, but if you’re using earlier versions of the program, try playing with Effect > Stylize > Round Corners to achieve a similar effect.

Step 4
Copy our shape and Paste in Back (Control-C > Control-B). Move the new shape to the left a bit by pressing Shift and the Left Arrow key a few times. Change the length of some of the stripes with the help of the Direct Selection Tool (A) to make the copy look a bit different. Make the new shape a bit darker than the upper copy.
Now let’s see how we can make the shapes fit each other. Copy (Control-C > Control-F) the bottom circle and Bring it to Front (Shift-Control-]). Select everything, click the right mouse button and Make Clipping Mask.
Great! Now we have everything hidden inside of the top circle! And we can still edit the contents of theClipping Mask by double clicking the object to enter Isolation Mode. For example, you can add another shape inside the planet, making it a bit darker.

Step 5
Let’s create another planet of a smaller size. Make a 130 x 130 px turquoise circle. Take the Line Segment Tool (\) and hold Shift to make a short horizontal stripe. You can edit the Stroke settings either from the control panel on top or from the Stroke panel (Window > Stroke). Make the Stroke color a bit lighter than the color of the planet. Set the Weight to 2 pt and the Profile to Width Profile 1, making the tips of the stroke pointed.

Step 6
Add more stripes, varying their length. Duplicate the circle and Bring it to front (Shift-Control-]). Select everything and Make Clipping Mask to hide the strokes inside the circle.

Step 7
Create a simple moon by making an 80 x 80 px circle, and continue using the Ellipse Tool (L) to cover the moon with dark-pink ovals, depicting craters.

Step 8
Let’s create our last planet, making it a bit more detailed. Start by making a 220 x 220 px orange circle.
Use the Rectangle Tool (M) to make a light-orange stripe across the circle. Hold Alt-Shift and drag it down, making a copy and attaching it right to the first stripe. Make the new stripe a bit lighter.
Continue adding stripes in the same way and vary the colors. You can leave a few gaps to make the color of the planet visible as well. What you can also try is to arm yourself with the Eyedropper Tool (I), holdingShift and picking the colors directly from my screenshot. Adobe Illustrator allows you to pick colors from any part of your screen, even outside the program window.
Use the Clipping Mask to hide the stripes inside the circle.

Step 9
Now let’s add a ring to our striped planet, similar to Saturn’s rings. Use the Ellipse Tool (L) to make two squashed ellipses above the planet. I make the top oval black to make it visible.
Select the ovals together with the planet and click the planet once again to make it a Key Object (you will notice a thicker selection around the object). Head to the Align panel and click Horizontal Align Center to make the objects perfectly centered.

Select both shapes and use the Minus Front function of Pathfinder to cut the top oval out, making a hole.

Step 10
Now duplicate the circle planet base and Bring it to Front (Shift-Control-]), and then Send Backward (Control-[) to one position, placing the circle right beneath the ring of our planet.
Select both the circle and the ring and take the Shape Builder Tool (Shift-M). Hold Alt and click the part of the ring that is overlapping the circle in order to delete it. As you can see, now we have a gap and two pieces of the circle that we don’t need anymore.
Delete the unneeded pieces and here we have it! Out Saturn-like planet is ready!

2. Render the Clouds
Step 1
Let’s make a few different types of clouds for different layers of atmosphere.
Use the Ellipse Tool (L) to make a 100 x 100 px light-blue circle. Add a second circle of 55 x 55 px on the right. Finally, attach a couple more circles on the left, varying the sizes and making the cloud puffy.

Step 2
Select all the circles and take the Eraser Tool (Shift-E). Hold Alt and drag the selection over the bottom of the cloud to erase it.
Finally, Unite all the circles in the Pathfinder and set the Opacity of the shape to 50% in the Transparencypanel.

Step 3
Now we’ll create a simple environmental element that will depict a stylized mountain or peak. Use theRectangle Tool (M) to make a 95 x 410 px vertical stripe.
Let’s fill it with linear gradient from dark blue to blue and to light blue. Set the Opacity of the light-blue slider to 0% in the Gradient panel, making it transparent. Use the Gradient Tool (G) to place the gradient vertically.
Select the top of the rectangle with the Direct Selection Tool (A) and use the Live Corners feature to make it fully rounded.

Step 4
Now we’ll make another kind of cloud.
Make a 220 x 25 px turquoise rectangle. Add a smaller rectangle on top, attaching it right to the first one. Then add a third rectangle on top of the second one, making it wide. Unite all stripes in the Pathfinder.
Make all the corners fully rounded, using the Live Corners feature.

Step 5
Add a few more clouds, varying their shapes. Head to the Transparency panel and set the Opacity of your clouds to 50%.

3. Make a Background and Arrange the Elements
Step 1
First of all, let’s set the size of our Artboard to 800 x 4400 px, using the Artboard Tool (Shift-O). You can select this instrument and set the size in the control panel on top.
Use the Rectangle Tool (M) to make a shape of the same size (800 x 4400 px) and Align it to the Artboard.
Let’s fill it with a vertical linear gradient, arranging the colors as shown in the screenshot below: moving from dark violet to blue and to lilac at the bottom.

Step 2
Let’s start adding our objects from the top. Place the planets over the dark part of the canvas, combining the elements with each other. Then start adding the clouds, varying their sizes and positions.
Step 3
Move down and use the stylized peak that we’ve created to form a group of peaks. Make multiple copies and place them next to each other and in front of each other, making some of them higher and the others lower. The bottom parts of the peaks blend nicely with the background as we’ve made them semi-transparent.

Step 4
Let’s add a few more shapes for the atmosphere. Create two large ovals, using the Ellipse Tool (L), and make them overlap each other, as shown in the screenshot below. Select both shapes and use the Minus Front function of Pathfinder to cut the shapes, so that we have only the crescent shape left.
Set the Opacity of the shape to 50% and make the color a bit lighter, if needed, to make the shape semi-transparent and airy. Add a second crescent on top, changing its color slightly.

Step 5
The bottom part of our background remains blank, so let’s fill it with new elements, creating a thick forest and the ground.
Use the Ellipse Tool (L) to make a group of circles, varying their sizes and making them overlap. Unite all the circles in the Pathfinder and fill the merged shape with a vertical linear gradient from lilac at the bottom to blue at the top.

Step 6
Now we’ll shape the tree trunk. Use the Rectangle Tool (M) to make a 75 x 1180 px narrow vertical shape for the trunk. Fill the shape with dark-violet color to create a contrast above the light background. Take theDirect Selection Tool (A) and select the top left anchor point. Press Enter to open the Move options window and set the Horizontal value to 20 px, Vertical value to 0 px. Click OK, thus moving the point 20 pxto the right. Repeat the same for the right anchor point, moving it in the opposite direction.
Let’s also add some simple branches to our tree. Arm yourself with the Arc Tool (you can find it in the same drop-down menu as the Line Segment Tool (\)). Make a curved line and set the Stroke color to the same dark-violet tint as we have for the trunk (use the Eyedropper Tool (I) and hold Shift to pick the color). Head to the Stroke panel and set the Weight value to 20 pt and Cap and Corner to middle positions, making the tips of the branches rounded.

Step 7
Duplicate our tree trunk and change the position of the branches to make the composition versatile. Place the trunks below the bushy tree crown by pressing Control-[.
Let’s add some dimension to our trees. Create another group of circles, filling them with violet color (a bit lighter than the trunks). Unite the circles in the Pathfinder panel and press Control-[ a few times to Sendthe shape Backward, beneath the trunks.

Step 8
Create more copies of the tree trunks and make them lighter. Place the copies beneath the darkest trunks, creating an aerial effect and adding depth to our forest.
Add purple bushes at the bottom of the trunks, forming them from the circles in the same way as we did with the tree crowns.

Step 9
Now let’s add a ground to form the bottom part of our composition. Use the Rectangle Tool (M) to make a shape of 800 px width (the same width as we have for our Artboard). Otherwise, you can just duplicate the background rectangle, move it on top and shrink it, reducing its height. Fill it with the same lilac color as the back tree trunks, to make the shapes visually merge with each other.
Now take the Curvature Tool (Shift-‘) and let’s bend the upper edge of the ground a bit by dragging its left half down. Make a smooth wave by pulling the opposite half of the upper edge up.

Step 10
Add another layer of the ground, filling it with the same tint of violet as we have for the middle tree trunks, making the shapes merge. Bend the shape, using the Curvature Tool (Shift-‘).
Finish up with the ground by adding the darkest layer on top, bending it, and using the Ellipse Tool (L) to speckle tiny ovals over the ground, making it a bit more textured.

Step 11
Now that we have all the objects placed and arranged, let’s see how we can hide the pieces that are crossing the edges of the Artboard.
Duplicate (Control-C > Control-F) the long background rectangle and Bring it to Front (Shift-Control-]).Now select everything, click the right mouse button, and Make Clipping Mask. Voila! Now all objects are hidden inside a big Clipping Mask.
What you can also do to make your further workflow faster, easier and more convenient is to gather our objects into several groups (a group of planets, a group of clouds, peaks, trees, etc.) and use separateClipping Masks for each group.

Step 12
You can continue adding the elements inside the mask in order to make the background more detailed and intricate. For example, I’ve added some stars, adding depth to the top of the background.

4. Draw Main Characters or Moving Elements on Your Background
Step 1
Now that we have our background ready, let’s create several objects that will be going all the way through the background when we’re scrolling it. These are going be the key elements that we’ll be moving from top to bottom of the background, one by one.
We’ll start by making a flying saucer. Use the Ellipse Tool (L) to make a 200 x 200 px turquoise circle. Make a horizontal magenta oval and Send it Backward by pressing Control-[.
Use the Line Segment Tool (\) and hold Shift to make a horizontal stripe across the circle. Select both the circle and the line and use the Divide function of Pathfinder to split the circle apart. Select the bottom half and Send to Back (Shift-Control-[), beneath the saucer.

Step 2
Use the Curvature Tool (Shift-‘) to bend the bottom edge of the upper circle, making it slightly curved.
Now let’s add some dimension to our UFO and decorate it with additional details. Copy the magenta oval and Paste in Back (Control-C > Control-B). Make the lower copy a bit darker and drag its bottom side down, using the Selection Tool (V), making the shape a bit larger.
Duplicate (Control-C > Control-B) the bottom half of the turquoise circle and shrink the upper copy a bit, dragging its bottom edge up. Fill the lower copy with yellow color, making a gentle overtone.
Use the Ellipse Tool (L) to make a group of yellow light bulbs along the edge of the saucer.

Step 3
Let’s finish up with our UFO by adding a shiny reflection to its glass surface. Copy the top half of the turquoise circle and Paste in Front twice (Control-C > Control-F > Control-F). Move the upper copy to the right a bit, using the Right Arrow key on your keyboard.
Select the top copy and the one beneath it and click Minus Front in the Pathfinder panel to cut the shapes, leaving only a narrow crescent-shaped stripe at the left edge of the UFO. Fill the created shape with light-turquoise color, forming a highlight. You can add a smaller circle of the same color on top, making the UFO look complete.

Step 4
Now let’s make a fancy character that is hidden inside the UFO – an alien. First of all we’ll make him look as if he is going down from his ship through the atmosphere.
Take the Ellipse Tool (L) and make a 50 x 50 px light-blue circle. Make a dark-blue oval for the eye. Keeping the eye selected, double-click the Reflect Tool (O) and flip the shape over the Vertical Axis. Click Copy to add a second eye.
Make a larger magenta circle of 75 x 75 px size and place it right beneath the alien’s head.

Step 5
Use the Rectangle Tool (M) to make a turquoise shape of 100 x 330 px size, placing it beneath the alien’s head. Select the bottom anchor points of the shape with the Direct Selection Tool (A) and use the Live Corners feature to make the bottom of the shape fully rounded.
Add two vertical narrow stripes above the turquoise shape and use the Minus Front function of Pathfinderto cut the shapes out.

Step 6
Use the Direct Selection Tool (A) to select the top anchor points of the stripes and drag them up or down, varying the height of the shapes. Use the Live Corners feature to make the corners rounded. Now the shapes look like a comet or falling meteorite.
Keeping the shapes selected, go to Object > Path > Offset Path and set the Offset value to 5 px, thus creating a larger shape.
Make the inner shape a bit lighter, adding dimension.

Step 7
Use the Direct Selection Tool (A) to vary the height of the dark and light stripes.

Step 8
Now let’s depict our alien in full length after he lands on the ground. We’ll use the head and will be adding elements to it. Use the Rectangle Tool (M) to make a 6.5 x 85 px light-blue shape across the head. Add a small 15 x 15 px circle on top.

Step 9
Now we’ll shape the body from a 70 x 140 px light-blue rectangle. Add two thin vertical stripes above the rectangle and use the Minus Front function of Pathfinder to cut them out, forming two long, thin arms.
Use the Direct Selection Tool (A) to move the bottom anchor points of the arms up, making them shorter than the body.

Step 10
Add another rectangle on top of the body and cut it out using Minus Front to shape the legs of our creature.
Use the Direct Selection Tool (A) and the Live Corners feature to make all the square corners fully or partially rounded.

Step 11
Let’s finish up our alien by selecting its body and using Object > Path > Offset Path with 5 px Offset value to make a larger shape around the body. Fill it with the same magenta-pink color as the circle around the head.

Step 12
Finish up with the background by placing the main elements right in the center of the background, starting from the UFO on top and finishing with the alien on the ground. And that’s all!

Fantastic! Our Long Scrolling Flat Background Is Finished!
Great job! We’ve reached the very end of our tutorial and finished the exciting process of creating elements and combining them with each other, building a balanced composition! We’ve learned how to transform basic geometric shapes and use various functions of Adobe Illustrator to make our workflow fast and convenient!
We can use these techniques for our future projects, creating flat seamless backgrounds, detailed compositions and flat-style scenery, landscapes, cityscapes and much, much more.
Now that we have a static version of our background ready, we can learn how to make it work and move! Stay tuned and don’t miss it!


I like it so much. What is next?
LikeLike